Category Archives: Powershell

OSD Scripting Hacks Part 4 – Renaming NICs

In a new series of short posts I’m going to show how to get around some frustrations I have had with the lack of GPO support for some common requirements plus a few other issues I have come across which have crept up recently.

More for a bit of fun really but this was another serious request I have had where a machine contained several adaptors, they should all be sequentially named to specification, in this case NIC1, NIC2, NIC3 ,etc.

Here’s the script. It renames the adaptor numerically and outputs to a logfile:

# Rename NICs
$number=0
ForEach($nic in (Get-NetAdapter -Name *)) {
$number += 1
Get-NetAdapter -Name $nic.Name | Rename-NetAdapter -NewName NIC$number - PassThru | Out-File %WinDir%\Temp\NicName.log -Append
 }

For MDT users I recommend using a commandline action as follows:

powershell.exe -ExecutionPolicy Bypass -command "$number=0; ForEach($nic in (Get-NetAdapter -Name *)) { $number+=1; Get-NetAdapter -Name $nic.Name | Rename-NetAdapter -NewName NIC$number -PassThru | Out-File %WinDir%\Temp\NicName.log -Append }"

That concludes this series for now until such time as another request comes my way…


OSD Scripting Hacks Part 3 – Disable NETBIOS in Powershell

In a new series of short posts I’m going to show how to get around some frustrations I have had with the lack of GPO support for some common requirements plus a few other issues I have come across which have crept up recently.

Another requirement that came up in my recent project was to disable the NETBIOS over TCP/IP setting function under the network adaptor settings | IPv4 properties | Advanced. The issue here is that there are multiple GUIDs present in the registry that must be changed and these can’t be easily predicted. Fortunately Powershell is kind to us and allows the use of a wildcard (*) to just hit them all. This is achieved with the following script:

 # Disables NETBIOS over TCP/IP
set-ItemProperty HKLM:\SYSTEM\CurrentControlSet\services\NetBT\Parameters\Interfaces\tcpip* -Name NetbiosOptions -Value 2

For MDT users, I recommend using a commandline action as follows:

powershell.exe -ExecutionPolicy Bypass -command "set-ItemProperty -Path 'HKLM:\SYSTEM\CurrentControlSet\services\NetBT\Parameters\Interfaces\tcpip*' -Name NetbiosOptions -Value 2"

Next, renaming NICs!

OSD Scripting Hacks Part 2 – Performance Settings

In a new series of short posts I’m going to show how to get around some frustrations I have had with the lack of GPO support for some common requirements plus a few other issues I have come across which have crept up recently.

In part 2, I will show you how to change the performance settings via a script which can be run from a task sequence step. Like the file extensions in Part 1, this was another area that (at the time of writing) seems frustratingly missing from group policy. I was creating an MDT task sequence recently to build some servers and one of the requirements was that the Visual Effects setting was specifically set for ‘Best Performance’ as opposed to Let Windows choose…

Anyway, the script:

# VisualFX - Best Performance
$RegKey ="HKLM:\SOFTWARE\Microsoft\Windows\CurrentVersion\Explorer\VisualEffects"
Set-ItemProperty -Path $RegKey -Name VisualFXSetting -Type DWORD -Value 2

For MDT, you may wish to run this as a commandline as follows:

powershell.exe -ExecutionPolicy Bypass -command "set-ItemProperty -Path 'HKLM:\SOFTWARE\Microsoft\Windows\CurrentVersion\Explorer\VisualEffects' -Name VisualFXSetting -Type DWORD -Value 2"

In the above I set the value to 2 for best performance. Other values can be:
0 – Let Windows choose what’s best for my computer settings.
1 – for Adjust for best appearance settings.
2 – for Adjust for best Performance settings.
3 – for Custom settings.

OSD Scripting Hack Part 1 – Enable file extensions for all users

In a new series of short posts I’m going to show how to get around some frustrations I have had with the lack of GPO support for some common requirements plus a few other issues I have come across which have crept up recently.

First in the series is a build fix for file extensions. By default, these aren’t enabled and at the time of writing there isn’t a GPO that can be applied that applies them for users when they log on so they have to be enabled manually. Personally I find it frustrating that I can’t see what kind of file something is and it is usually the first thing I change when  I log into a new computer. Anyway, among others, this became a requirement for a recent project I was on and after a bit of playing around and further research I came up with the following Powershell script:

reg load HKLM\DefaultUser C:\Users\Default\NTUSER.DAT
 $path = "HKLM:\Defaultuser\Software\Microsoft\Windows\CurrentVersion\Explorer\Advanced"
 New-ItemProperty -Path $path -Name HideFileExt -Value "0" -Type DWord
 reg unload HKLM\DefaultUser

This should be run as a task sequence step but depending on your deployment tool of choice, Powershell commands can occasionally be a little fussy. If you are using MDT, you might find the following works better if set up as a commandline:

Powershell.exe -ExecutionPolicy Bypass -command "reg load HKLM\DefaultUser C:\Users\Default\NTUSER.DAT; New-ItemProperty -Path 'HKLM:\Defaultuser\Software\Microsoft\Windows\CurrentVersion\Explorer\Advanced' -Name HideFileExt -Value 0 -Type DWord; reg unload HKLM\DefaultUser"

The above should also work fine for SCCM although SCCM isn’t as picky as stand-alone MDT so either might work there.

Next time, Performance settings.

Can’t run PowershellInstance.invoke() from C# (but code is fine)

I recently wrote a GUI to duplicate MDT database roles based on the excellent Powershell commandlets written by Michael Niehaus:
http://blogs.technet.com/b/mniehaus/archive/2009/05/15/manipulating-the-microsoft-deployment-toolkit-database-using-powershell.aspx.
Although the Powershell code worked fine when executed directly in a Powershell window, I was seeing mixed results when executing the same code in C# through PowershellInstance.invoke(). Specifically, when I compiled the executable I was able to run the powershell code through the utility without issue, whereas it failed for my colleagues for some reason.

THE FIX

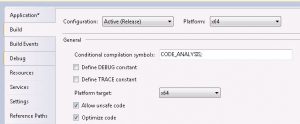
It seems that what I needed to do was ensure that the code was compiled specifically for the platform I was running it on as opposed to ‘any CPU’. In my case this was for x64. You can set this under the project properties in Visual Studio:

Platformx64

However, after making this change, I found I was getting compilation errors along the lines of:
An attempt was made to load an assembly with an incorrect format: [path to exe]

To fix this, I needed to change Generate serialization assemply to Off and everything compiled as expected. More on this here.

New-CMBoundary IPSubnet Doesn’t work

CM2012 introduces to us the ability to easily script many labour-intensive tasks. I was recently adding numerous boundaries to a ConfigMgr implementation for a client so decided the best approach was to automate this procedure.  I fired up the Powershell session from within ConfigMgr and checked the syntax for New-CMBoundary. Now, I had a spreadsheet with a bunch of IP subnets in CIDR notation so it made sense to use this for my script. Running Get-Help New-CMBoundary I got the following:

Example 1: Create a new IP Subnet site boundary
PS C:\>New-CMBoundary -DisplayName "IPSubNetBoundary01" -BoundaryType IPSubNet -Value "172.16.50.0/24"
BoundaryFlags: 0
BoundaryID: 6338009
BoundaryType: 0
CreatedBy: Contoso\PFuller
CreatedOn 6/10/2012 1:17:42 PM
DefaultSiteCode:
DisplayName: IPSubNetBoundary01
GroupCount: 0
ModifiedBy:
ModifiedOn:
SiteSystems:
Value: 172.16.50.0/24

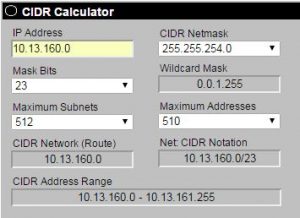
Looks straightforward enough but no. This simply doesn’t work as stated. The problem seems to be that it doesn’t understand the ‘/24’ part (in this example). Instead, what you first need to do is to find the subnet ID which is associated with your address. If you’re unsure what this is then I’d recommend you use something like http://www.subnet-calculator.com/cidr.php:

cidrcalc


In the example above we have a CIDR range of 10.13.160.0/23. You can see from the calculator that this produces a network ID of 10.13.160.0. Therefore the correct syntax for New-CMBoundary is as follows:
New-CMBoundary -DisplayName “IPSubNetBoundary01” -BoundaryType IPSubNet -Value “10.13.160.0”
All that said, I’d personally avoid IPSubnet boundaries completely. Instead, just go for a range, far simpler to understand. The CIDR calculator is again helpful for this and displays the range at the bottom.
Thankfully, the IPRange syntax is correct so you shouldn’t have any issues.