Running two (or more) networks from a Thomson Gateway (TG585 v8) router

A key requistite in running a successful home-lab setup is to get at least a couple of separate networks connected together. This will create a more realistic ‘work-like’ environment to test any server configuation you have.
Personally I have a bit of a mish-mash of routers and switches to do this with and although I knew the theory of how this should work, I did struggle slightly getting the Thomson to forward packets like it should do. I put this down to the version I have (v8) and any documentation I could find was all v.7.
My other router is a MikroTik RouterBoard and I highly recommend investing in one of these if you’re serious about routing. They’re cheap (sub £50) but offer everything you’d expect on a professional router. Everything. In all honesty, most of the stuff this router will do I’ll never need nor indeed, understand. But if you’re looking for another router for this kind of lab setup, I can’t recommend it highly enough.
Anyway, my goal was to set up my network similar to that below:

network

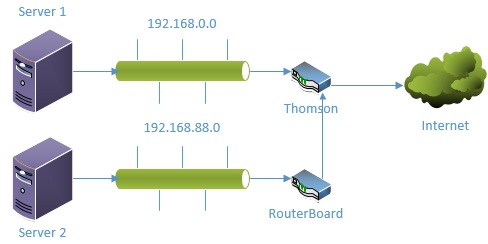
Having plugged the WAN interface of my routerboard into the Thomson, I was immediately able to access the 192.168.0.x network and hence, the internet. Great. However going back the other way wasn’t so pretty. “hmmm…looks like I need a static route set on the Thomson router” I thought. However there appeared to be no way of configuring this from the router interface. After a bit of digging, I discovered I was able to telnet to the router and set it that way. I found this link which led me in the right direction:
http://networkoz.blogspot.co.uk/2012/10/add-routing-in-thomson-tg585-v7.html#!/2012/10/add-routing-in-thomson-tg585-v7.html
However I was still unable to contact the 88.x network from the 0.x network. Turns out the problem I was having was that the gateway I added was actually incorrect:
ip rtadd dst=192.168.88.0/24 gateway=192.168.88.1 intf=LocalNetwork srcintf=LocalNetwork static=enabled

So what had I done wrong? Well the gateway should actually be the interface on the 0.x network. What was happening is that the Thomson router was providing a dynamic address to the WAN port of the routerboard, and it was this address I should have been providing as the gateway address. In my case this was 192.168.0.64, so the command line should actually have been the following:

ip rtadd dst=192.168.88.0/24 gateway=192.168.0.64 intf=LocalNetwork srcintf=LocalNetwork static=enabled

Obviously you should really make sure this address is static but this address won’t change in my configuration so it’s fine. My routing problem was then solved.

Some resources that helped me solve this problem (and one or two others)
List of telnet commands on Thomson Router
http://npr.me.uk/telnet.html
Set up DHCP configuration via telnet on a Thomson Router (not directly relevant, but helped me out elsewhere)
http://www.jpdw.org/tg585/dhcp-configuration

Unable to access DFS shares in Windows 7 (drives not mapping)

There could of course be plenty of reasons you’re experiencing this behaviour but I’ll zoom in on two which I’ve noticed are particularly prevalent with Windows 7 and which may not be immediately obvious.

Server Message Block Signing

The first time I saw this behaviour, it was after I’d introduced a hardened-build policy (yes the very same Win7-EC-Desktop baseline policy I refer to in an earlier post). The problem is to do with the Server Message Block Signing policy. There are two fixes – either update the servers holding your DFS shares to acknowledge the policy so Windows 7 can talk to them securely or simply disable the policy on the Windows 7 clients. The first is preferable, the second solution is easier, your choice.

SMB

Change group policy to reflect the settings in the image and you should be fine. Obviously this is the easier, second option!

Token Size

Assuming this has been ruled out, the second, possibly less obvious reason for failure to connect to DFS shares is user token size. For those unfamiliar with token size, it basically relates to the size of the security ‘token’ you are issued with when you log onto a computer in a domain. This token is responsible for security assessment throughout your logon session. As more groups are added to your user account the token size increases. If you were to add a group that has another hundred groups nested in it, then your token size will increase accordingly!

Although this was a problem with Windows XP, it was generally more forgiving than in Windows 7/8 and for this reason you are more likely to notice the problem if you have recently upgraded. To confirm the issue, you are likely to see a message in the ‘system’ log in event viewer like the one below:

TokenSize

Again there are two choices you can make here. Firstly, you can increase the token size available for domain accounts in group policy. This, in my opinion, is the sensible way to fix the issue if you aren’t able to do much about the group sizes. The second, easier option is to remove groups you can do without until the token size is back to a respectable level. If this proves to be a slightly easier choice for you then you might require multiple accounts, eg one with admin groups to do privileged operations and another which lets you do day to day stuff. You can always use the run as… feature to save you logging off/on all the time.


Windows 2012 – Problems creating new forest / domain from scratch

OK so I decided to take a look at Windows Server 2012 and obviously the first thing you want to do after installation is to add AD DS. This is a pretty straightforward operation, not a whole lot different to how it’s done in Windows 2008. Simply select roles and features, add AD DS and follow the wizard through, creating the new forest, domain and DNS on the way.

However this is where I started to see some problems. I can’t say for sure whether I am the only one to experience this problem but as soon as the installation finished I was unable to open any AD tools and I was presented with an error similar to the following:

“The Specified Domain Does Not Exist or Could not be Contacted”.

My initial reaction after some minor troubleshooting was simply to remove and re-install it, after all this was a brand new installation and I really shouldn’t be seeing these issues on such a virgin server. I removed and reinstalled twice but still saw the same issue. Now as much as I love a challenge, I’ve been a busy man recently with one thing and another and finally this was an opportunity to use one of my support calls up that came with my Technet subscription. Last year I didn’t use any and it annoyed me I couldn’t carry them over. But I digress. I will therefore blog their analysis which finally fixed the issue. Apologies for the slightly iffy grammar, I’ve tried to fix the worst of it! I am still at a loss why I have experienced this issue, I’d be interested to hear if anyone else has had similar issues with server 2012.

___________________

=> On server 2012 made sure we have default shares “Sysvol & Netlogon” available as shared. This wasn’t the case.

=> With server 2012(a New Forest & Domain) the Sysvol replication is done by DFSR, thus checked the events in DFSR for any errors/warnings. We found the following :-

“The DFS Replication service stopped replication on volume C:. This occurs when a DFSR JET database is not shut down cleanly and Auto Recovery is disabled

=> We ran the following Command in order to recover from the Issue, and resume the replication :-

“wmic /namespace:\\root\microsoftdfs path dfsrVolumeConfig where volumeGuid=”69718B5D-152F-11E2-93E8-806E6F6E6963″ call ResumeReplication”

(Note: enter appropriate GUID)

=> Since server 2012 is the only server part of Forest/Domain, we followed the KB :- 2218556 (http://support.microsoft.com/kb/2218556) and made the server authoritative.

=> Once done we had the “Sysvol & Netlogon” available as Shared, and were able to open the AD Snap-Ins and DNS was up & running fine.

__________________________________________________________________________________

With Server 2012 being the first DC in domain, the Sysvol replication is done using DFSR and detailed analysis of the DFSR logs yesterday revealed the DFSR service itself was in a state of error. We were getting an event id 2213 wherein the DFSR Jet database was not shutdown properly. This happens every time the service is stopped. Moreover by default auto recovery is not enabled for DFSR and without this starting and running correctly, he Sysvol & Netlogon shares weren’t getting shared. When we found the event we first fixed the DFSR database for Sysvol as per the KB and then resumed the replication using WMI command. This made sure the database is set correctly and the replication is underway. Sysvol and Netlogon were then shared.

MICROSOFT SUMMATION

PROBLEM DESCRIPTION:-

Unable to Open AD Snap-Ins and Getting The Specified Domain Does Not Exist or Could not be Contacted

RESOLUTION:-

=> We promoted a server to a domain controller running 2012, the dcpromo process went fine without any issues, however when the server was restarted we couldn’t open any of the AD Snap-Ins and not DNS

=> The DNS zones failed to load and the snap-ins error out with “The Specified Domain Does not exist or could not be contacted

=> When checked the serer we found the Default Shares of “Sysvol & Netlogon” missing

=> The server is running 2012 so the Sysvol replication would be on DFSR, thus we need to make the server authoritative for the same

=> We first made sure we have policies and scripts created fine, once done we followed the steps in KB 2218556 (The steps were followed in LDP as ADSIEDIT would not load the partitions)

=> Once we were able to perform the steps we checked the events, were getting the event for DFSR Database issues, also checked the Debug Logs in Detail, and ran the following :-

wmic /namespace:\\root\microsoftdfs path dfsrVolumeConfig where volumeGuid=”69718B5D-152F-11E2-93E8-806E6F6E6963″ call ResumeReplication

=> We got the event id :- 4602 and the sysvol , netlogon got shared fine

RELATED KNOWLEDGSE BASE ARTICLES :-

http://support.microsoft.com/kb/2218556


How to deploy x86 and x64 universal printer drivers en-masse

I was recently asked to come up with a solution to update our entire print server esate (around 600 boxes) with univeral PCL6 and PS drivers over x86 and x64 architectures. Specifically in this case I was asked to update with Lexmark and HP drivers although I see no reason this solution shouldn’t extend to any other manufacturers.

Since we have SCCM, my immediate idea was to create a package and push all packages out to the servers concerned but I found some shortcomings when creating the driver packages. Lexmark provide a tool to create the packages but I found I was unable to install both x86 and x64 drivers on the same machine. In fact, the executable created for the x86 drivers just threw errors. For the HP drivers, I had to throw in a few command line switches but again it simply wouldn’t install both architectures of driver. I should point out that the print server I was using for the test was Windows 2008 x64.

So another method was required. After much testing, I found the most reliable method was to use the Microsoft utility, prndrvr.vbs. This utility (along with several others) can be found under C:\Windows\System32\Printing_Admin_Scripts\en-US on the print server. I then deployed these using a task sequence in SCCM, running this utility with the drivers in question. Everything installs just fine and I don’t get any of the other rubbish which the manufacturer utilities include, such as extra printer objects, pre-configured ports etc. I have outlined what I did below for the HP drivers but remember, this should work for any print drivers.

  1. Download HP Universal Drivers package from the net. Create a folder called HPUniversalDrivers in C:\Temp on your test workstation. Create another folder inside called HPUPD. Copy xcopy.exe into this folder. Copy the 32bit and the 64bit folders out of the HP Universal Drivers package into C:\Temp\HPUniversalDrivers\HPUPD. Finally copy prndrvr.vbs into C:\Temp\HPUniversalDrivers\HPUPD. Your HPUPD folder should now contain two folders (32bit and 64bit) and the vbs script.
  2. Create a package in SCCM pointing the source to the location we have just described on your test box, eg \\testbox\C$\temp\HPUniversalDrivers, create a distribution point and update it. You don’t need a program.
  3. Create a new custom task sequenceSelect General > Run Command Line: NAME=Copy HP Drivers Locally, Command Line=xcopy “HPUPD” “C:\Temp\HPUPD\” /E /Y, select the ‘package’ checkbox and browse to your HP driver package you created earlier. OK
  4. Decide which driver version you require. You may have to dig about in the .inf files to find the one for your particular requirements but for the purposes of this blog I required v5.4 which could be found in hpcu118d.inf: 
    • Create a new custom task sequenceSelect General > Run Command Line: NAME=HP UPD PS v5.4 x86, Command Line=cscript prndrvr.vbs -a -m “HP Universal Printing PS (v5.4)” -e “Windows NT x86” -i “C:\Temp\HPUPD\32bit\PS\hpcu118d.inf” -h “C:\Temp\HPUPD\32bit\PS”, Start in:= C:\Temp\HPUPD
    • Create a new custom task sequenceSelect General > Run Command Line: NAME=HP UPD PCL6 v5.4 x86, Command Line=cscript prndrvr.vbs -a -m “HP Universal Printing PCL 6 (v5.4)” -e “Windows NT x86” -i “C:\Temp\HPUPD\32bit\PCL6\hpcu118c.inf” -h “C:\Temp\HPUPD\32bit\PCL6”, Start in:= C:\Temp\HPUPD
    • Create a new custom task sequenceSelect General > Run Command Line: NAME=HP UPD PS v5.4 x64, Command Line=cscript prndrvr.vbs -a -m “HP Universal Printing PS (v5.4)” -e “Windows x64” -i “C:\Temp\HPUPD\64bit\PS\hpcu118v.inf” -h “C:\Temp\HPUPD\64bit\PS”, Start in:= C:\Temp\HPUPD
    • Create a new custom task sequenceSelect General > Run Command Line: NAME=HP UPD PS v5.4 x64, Command Line=cscript prndrvr.vbs -a -m “HP Universal Printing PCL 6 (v5.4)” -e “Windows x64” -i “C:\Temp\HPUPD\64bit\PCL6\hpcu118u.inf” -h “C:\Temp\HPUPD\64bit\PCL6”, Start in:= C:\Temp\HPUPD
    • Create a new custom task sequenceSelect General > Run Command Line: NAME=Remove HP Directory, Command Line=cmd.exe /c RD C:\Temp\HPUPD /S /Q
  5. Your task sequence is now complete. Next, create a collection and add the print server of your choice to the collection. Advertise the task sequence to the collection and you should be good to go. This example will install both x86 and x64 drivers, PS and PCL6.

Print Drivers

Disclaimer: I am in no way responsible if you accidentally deploy something nasty to your whole estate. Please test responsibly before deployment!

Connection to Hyper-V VMs are very slow from remote Windows clients

So you have your Hyper-V box set up along with several virtual servers. Communication between Hyper-V host and VMs is fine. However when a remote Windows client tries to browse for a share on a VM there is a very long delay (sometimes minutes) before the share is displayed.

This problem had me puzzled for a fair while. Fortunately it was only in my lab environment but it was still frustrating. My network was IPv4. What I needed to do was to disable most of the advanced properties under the virtual network adapter on the Hyper-V host. Unless you have a IPv6 network you can leave the IPv6 settings as they are. After I’d disabled all these settings I was able to successfully browse shares properly.

RDP stops working for XP clients trying to remote to Windows 7 clients after applying Win7-EC-Desktop baseline policy

Sorry, not the catchiest of titles but it does what it says on the tin (unfortunately).

Essentially, following the application of the Microsoft-recommended Win7-EC-Desktop baseline hardening policy (this baseline and others can be found when you install Microsoft Security Compliance Manager solution accellerator) users on XP desktops are no longer able to reach those Windows 7 machines that are subject to this policy. Two weeks on the phone to Microsoft resulted only in various network monitor captures, procmon captures and general frustration. In the end it was simple. Instead of concentrating on the specific RDP changes made in the policy, it was to do with the new firewall settings.

Just change Allow the connection if it’s secure to Allow the connection:

UPDATE

An fix has been created by Microsoft which both myself and the original customer who raised the bug have recently beta tested and approved. A full KB article and the final approved release version will be made available from the Microsoft site around about the 13th November 2012.

Headaches of an SCCM Admin.